Easy Distress Inking

Hello and welcome. Today’s video shares how to do easy inked backgrounds. This technique is simple to do and the only tools required are ones we all have!

Inked Backgrounds Video by Jennifer McGuire Ink

[All supplies are linked to multiple sources in the thumbnails at the end of this post. Compensated affiliate links used at no cost to you. To watch the video in HD on YouTube, click HERE.]

Today’s technique is fun, fast, and functional! I hope you will give it a try. I used the new Tim Holtz and Simon Says Stamp exclusive stamp + stencil set, but you could also check out all the new holiday stamps from Tim HERE. It is a great release!

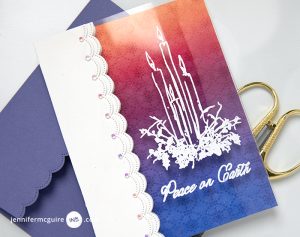
After white heat embossing a few images from the new Tim Holtz and Simon Says Stamp stamp set on watercolor paper, it is time to get inky!

Inked Backgrounds Video by Jennifer McGuire Ink

Because I wanted a bit of shine to my backgrounds, I started by making a “pearlized water” mix with water and Perfect Pearls in a mist bottle. You could use plain water if you want.

For each card I chose three or so colors of Distress Inks (see thumbnails below) and applied them to my craft sheet. After a few mists of my spray, I used my fingers to pick up the color and apply it to the paper. (The embossing will resist the ink.) I know many people don’t like getting inky, but I promise it’s fun! It’s like finger painting.

Inked Backgrounds Video by Jennifer McGuire Ink

The great thing about using your fingers is you have control of where the color goes. I put a lot of color down – many layers. The more color you add, the more intense your piece will be. Oh, and don’t waste the ink left on your craft sheet! You can put it to good use by swiping another embossed piece through it to create another card.

Inked Backgrounds Video by Jennifer McGuire Ink

To get a finished look to the inked backgrounds, I applied one of the colors of Distress ink to the edges using an Ink Blending Tool. I also added a faux stitched border along the card’s edges using a die from My Favorite Things. I like that it doesn’t cut but rather pierces the paper.

Inked Backgrounds Video by Jennifer McGuire Ink

You can do this technique with other dye inks, but Distress Inks work the best because they react so well with water.

Again, the stamp set I used today is an exclusive and there are limited supplies! But also be sure to check out all the new holiday stamps from Tim HERE.

SUPPLIES

Interested in the products I used? To make them easy for you to find, I have listed them below. (Compensated Affiliate links used at no cost to you. Affiliate and product disclosure can be found here. All products were personally purchased except those with an asterisk. As always, this post was NOT sponsored.)


Leave a Comment

70 thoughts on “Easy Distress Inking”

  1. maryann says:

    i love that you used your fingers! I don’t mind getting inky and I’m going to try it.

  2. I never would have thought of using perfect pearls in a spritzer! This is such a cool technique and I love the end result.

  3. Brenda in IN says:

    This is just the most fun way to do color! I love the way the colors mixed and look kind of varigated. Will try this soon.

  4. Teresa Coleman says:

    Who doesn’t love inky fingers!?! right?? 🙂 the distress inks look so perfect for this finger watercolor technique! who knew..

  5. Sue D says:

    Very cool!

  6. SharonJ says:

    love the technique.

  7. Shubhi Srivastava says:

    Distress inks are my favourite tool and I simply love the messy unique look of theirs. Brilliant video as always. Thanks you for sharing.

  8. joy meadows says:

    Love these cards – what a fun way to create the background!

  9. Teri Ann says:

    What a GREAT look!!!
    HEY! I have that tool!

  10. Jen Hayes says:

    Gorgeous!

  11. janet says:

    Hi Jennifer, gorgeous cards with such a wonderful technique – glad to see you re-using it 🙂

  12. TracyM #6773 says:

    GORGEOUS cards and EXCITING technique … I look forward to getting “shimmering rainbow fingers” this weekend!!!

  13. Paulina says:

    Looks like fun and the results are beautiful! does your craft sheet handle this water being sprayed over? I usually keep sheet of typing paper behind when I stamp but I think it won’t work good with water

  14. Grammy P says:

    What wonderful cards and they look so simple to make! I am definitely going to try this technique very soon! Thank you once again for all the inspiration and education you provide!

  15. Deborah Kaye says:

    Beautiful cards and looks like a ton of fun to do! This could be done with children and simpler images for them to send to grandparents.

  16. Fran Smith says:

    These cards are stunning. You really break the technique down so that we know that we can do to too. Thanks for the inspiration.

  17. Gayle says:

    What a beautiful technique. I have to try this. Jennifer you always have fantastic ideas. Thanx again for sharing!!!

  18. rmcrivera says:

    oohh!!!! going to try this minus the stamps since I can’t get the stamps right now 🙂

  19. Ellen Vargo says:

    I’ve been following your blog for many years and despite the fact that my style isn’t always as clean and simple as yours, I just can’t stop watching. I think you are an *amazing* teacher. Your videos are so clear, instruction is detailed, many options given, the list goes on and on. After a long break from card making, I’m jumping back in and so excited about it. You are *awesome* at your job! Since you work for yourself, I thought it might be nice to hear that from time to time. I love your new house, and I’m sure you will make it a wonderful home for your family. Just remember to breathe and rest sometimes! LOL. Sending lots of good wishes and appreciation to you. ~ ellen.

  20. Linda Tupper says:

    What lovely cards and such a great technique that I will be trying. I just love the look. I am also going to try the perfect pearls mix. I just love your videos. You teach me how to do things I never tried before.

  21. terrie rodrigue says:

    Great video and great technique…….I can see this with a flowery stamped images……
    thank you Jennifer for sharing your ideas…

  22. barb macaskill says:

    WOW!! These are so rich and elegant looking! Will be watching the video later tonight when I am snuggled in for the night!! TFS!

  23. Maureen Reiss says:

    Really Beautiful cards!! Love the finger inking, soooo Fun!!

  24. Teresa Doyle says:

    What a great technique Jennifer, WHO on this planet doesn’t have OR want TH Distress inks! They are THE best!
    Love your cards!

  25. LeslieS says:

    Love how simple and lovely this technique is! Thanks for another great video, Jennifer. Awesome new stamps from Tim, as well – I agree some of his best!

  26. Julie says:

    Love that retro tree with rays of light. I saw your cards on Tim’s video highlighting this release and headed over to see your video.
    as someone who just moved this summer (after 18 years in the same house with a jam-packed craft room), I’m impressed with how quickly you’re set up to make videos. My craft room was the last to be unpacked since we also had guests shortly after we moved! I repurposed shelving and cabinets for my new craft room, and my husband built shelves for the closet. I also donated lots of supplies I no longer use to the Montessori school. There was an adjustment period, but I really like my new space.

  27. Carol L says:

    Beautiful cards and what a fun technique. You always deliver such great tips and techniques in your videos. I love to watch them.

  28. Sharon Jones says:

    I haven’t thought of using my fingers for this technique. Great idea! Your cards are beautiful. Thanks.

  29. craftygal68 says:

    I’ve used Perfect Pearls in a spritzer before, but love the new “tool” – fingers! Love the way it looks.

  30. barbara lassiter says:

    It doesn’t seem to matter whether I like inky fingers or not, I usually have them. So I think using this technique wouldn’t be a problem. I like the control you seemed to get with the Distress Inks ( my favorite product from Tim & Co. ) and loved the results on these beautiful cards. I have a poinsettia stamp of Tim’s that would make a beautiful card using this technique. Thanks for the inspiration.

  31. lori uren says:

    I’ve never used perfect pearls. Love th8s look.

  32. jengd says:

    Simple technique, lovely results!

  33. Debbie p says:

    Great cards. Thank you for sharing all your great techique.

  34. Deepa Lakshman says:

    I like the colors you chose for this. The Tim Holtz stamps are wonderful.

  35. Loly Borda says:

    Thanks for the inspiration Jennifer! I love your cards!

  36. Colleen Howell says:

    Very pretty and a new technique I have not seen before, thanks for showing us

  37. Hi Jennifer-
    I love how you take something so incredibly amazing and lush in color, and break it down to such simple steps! I’ve been finger painting since I was two-years-old! I know I can do this, but I never would have thought of doing it! I think my husband may even join in with getting started on next year’so cards!

    He-IS-Able!
    Traci Starkweather
    [email protected]

  38. Sue Townsend says:

    Such an easy technique. Love the results, other than my aqua fingers!! Thank you for sharing 🙂

  39. Arlene Plastine says:

    I love your beautiful cards, Jennifer and who cares about inky fingers if you can come out with these results!

  40. Michele W says:

    Love this technique! It’s like finger painting for adults. Thanks!

  41. Jean Bullock says:

    Thanks for the great video. I love Tim’s new stamp and you did a wonderful job with it.

  42. stamping sue says:

    Jennifer, wonderful cards. I did this technique with you in a class years ago….it was fun.
    stamping sue
    http://stampingsueinconnecticut.blogspot.com/

  43. Tona says:

    Your cards are great! I can’t wait to give this technique a try. Thanks for the inspiration.

  44. jenniferk says:

    Your cards all look fantastic! I just ordered this stamp set and I will defiantly be giving your technique a try. Thank you for the great tutorial as well, I think this technique really is awesome and I love the color combinations that you used.

  45. Sandy in Calif. says:

    Jennifer – thank you so much for your blog today. I tried the technique using distress inks wild honey, mustard seed, spiced marmalade and fired red – it turned out fantastic. I was reminded of when I was taking a water color class at my local art center and the instructor was telling us different things we could use to enhance our paint, such as cotton, salt, plastic wrap, craft knives, etc. I said I found a new one – my finger tips – and she (literally) scoffed at me. I feel much better now!! Please keep sharing with us.

  46. lilola says:

    I love the idea of using my fingers! Will be trying this technique for sure! TFS!! I also love this stamp set.

  47. Roxana says:

    Oh my! Jennifer these cards are gorgeous, the technique you are sharing looks so much fun with astonishing results. Thank you for the inspiration ????????

  48. Stacy V says:

    These cards are just stunning! Thank you for sharing your techniques!

  49. Viola Leary says:

    I opened a Simon stamp email before I opened this one and the tree you did in red was in it. I was busy at the time. When I went back to my emails I saw your posting. I should have known that you made it. I Always love Everything you make, you are such an inspiration to all of us who follow your blog.
    I’m signed up for the wild card class. I can’t wait.
    Bless you for all of your hard work. I get absolutely giddy when I see another email alert that you have a new blog post, I’m sure we all do.

  50. Wonderful technique. So much fun and as for the inky fingers, try some Dawn dish detergent, I find it works great for me to get inky fingers clean. Thanks for another fabulous video.

Leave a Reply

Your email address will not be published. Required fields are marked *